vkQuake configuration on Windows
This guide will show you how to set up everything on your Windows computer so you can run Quake using the modern Vulkan-based source port, vkQuake.
Table of Contents
Intro
Setting up vkQuake on Windows (or Linux for that matter) is a relatively simple process. While there is a straightforward guide on the vkQuake GitHub page, this guide attempts to detail getting things set up in the most basic way providing easy to follow steps.
In one of my previous guides, I detailed how to configure QuakeSpasm. However, given the significant improvements made to vkQuake and the the fact that it is currently in active development, it is hard to recommend using QuakeSpasm anymore.
What improvements have been made you ask? Well, to quote directly from the vkQuake GitHub page:
- Better performance
- The game can run at higher frame rates than 72Hz without breaking physics
- A software Quake like underwater effect
- Better color precision reducing banding in dark areas
- Proper mip mapping for water surfaces to reduce aliasing
- Native support for anti aliasing and anisotropic filtering
- More modern protocol to avoid certain movement issues (from QSS)
- Support for custom mod HUDs (from QSS)
- Support for scriptable particles (from QSS)
Downloads
Prerequisite: Microsoft Visual C++ Redistributables. Either download and install the VC++ redist packages on each of the below software links, or simply install via winget (if using Windows 11) in the Windows Terminal by using the following command: winget install -e Microsoft.VC++2015-2022Redist-x64
vkQuake - Download the latest win64.zip package.
Quake - If you haven't already, buy Quake on GOG (or your digital distribution platform of choice) and install it.
Directory structure
For the purpose of this tutorial and to keep things simple, we will set everything up in C:\quake\.
Let's create a skeleton directory structure that looks like the below:
\quake\
\vkquake\
\id1\
The reason we have the extra vkquake directory sitting under the quake directory will become apparent if you follow my other tutorials. Basically, if you want to start making Quake maps, it's best to set things up like this.
Extract the contents of your newly downloaded vkQuake zip file into C:\quake\vkquake.
Copy your pak0.pak and pak1.pak files from your Quake installation directory to C:\quake\vkquake\id1.
Configuration
autoexec.cgf
The first thing we need to create is an autoexec.cfg file in C:\quake\vkquake\id1. This file acts as an override for any settings automatically generated and stored in C:\quake\vkquake\id1\config.cfg, and also allows you to store settings between installations. Below is the contents of my autoexec.cfg file. Experiment with yours to see what works for you best.
host_maxfps "165" #this depends on the maximum refresh rate of your monitor
crosshair "1" #adds a crosshair to the centre of the screen
r_viewmodel_quake "1" #pops the gun up to it's original angle
scr_showfps "1" #shows the framerate in the bottom right corner of the screen
r_waterwarp "2" #adds an underwater warp effect
r_novis "1" #adds water transparency
r_wateralpha "0.6" #defines how transparent water is
scr_conscale "3" #size of console text when pressing "~"
scr_sbarscale "3" #size of bottom status bar
scr_menuscale "3" #size of menu font
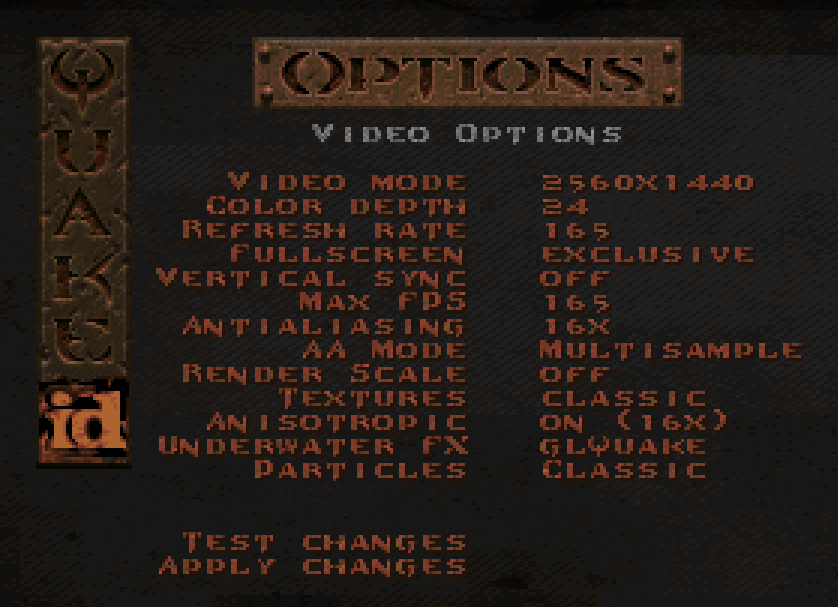
Video options
Once you run Quake from by running C:\quake\vkquake\vkQuake.exe, open up the video options menu by pressing "Esc" and selecting "Options" -> "Video Options".
Below are ideal settings for my system, but this will depend on your system and the specifications of your monitor: